With the rise in the number of multimedia-enabled computers in schools, higher bandwidth capability, and lower costs for video editing equipment and software, more and more teachers are embracing video as an instructional tool. (Branigan, 2005)
Lights Out!
As the 15 or so graduate students enter their dimly lit classroom, they are offered popcorn and candy and asked to take their seats. This is the night they finally view their self-produced videos, ones they have been working on for the past 5 weeks. These videos have titles and purposes as diverse as The Purse, an open-ended comedy that concludes by posing for its audience an unresolved moral dilemma (see excerpt from Video 1); A Day in the Parking Lot, a how-to video, demonstrating the tricky mechanics of parallel parking (see Video 2); Under Pressure, a satirical send-up of how adult students prepare for and take a professor’s final examination; and Share Your Snack, Not Your Germs, a light-hearted instructional video intended to show early-elementary school students how not to transmit their colds to one another.
To enhance their communal viewing and listening experience, the graduate students watch their “movie stories” (Sherman, 1991) as they are projected onto a large screen, accompanied by a set of high-quality speakers. Awards are distributed for Best Actor in a Leading Role, Best Original Screenplay, Best Pictorial Continuity, Best Cinematography, Best Graphic Design, and so on (see Figure 1). All are recognized for their achievements; all have some fun as well. Producing a “literate” video that communicates its message clearly for a specific audience is challenging, but rewarding, work. Teacher educators, classroom teachers, and administrators planning to systematically and creatively infuse video technology into their programs or classroom instruction will find the following unit of great utility.
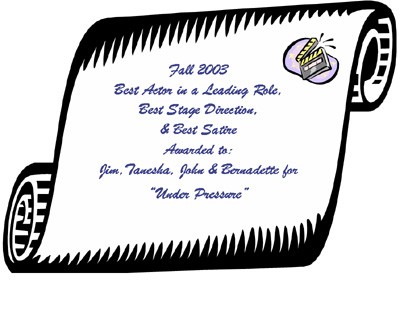 Figure 1. Sample award certificate.
The Context
The preservice and in-service teachers enrolled in this graduate course, entitled Educational Technology, meet for 3 hours per evening, once a week for 15 weeks. This three-credit course is one of the 15 graduate-level classes in which the students enroll to work toward earning both a masters of education degree and state-teacher certification/licensure. Typically, students in this graduate program are change-of-career adult learners seeking to become certified teachers either at the elementary/special-education or the secondary-education level in subject-matter content areas such as English, mathematics, biology, and social studies. Some of the graduate students have little to no classroom teaching experience; others, have anywhere from 1 to 5 years of experience. One or two students may be certified in-service teachers who are seeking a masters degree in education solely for professional development purposes.
The overarching goals of this course are designed to encourage students to develop a growing confidence in their ability to choose, adapt, create, and use various product technologies (hardware and software) for classroom use; demonstrate a willingness to experiment and use, in creative ways, various blends of product and idea technologies in their own planning and teaching; understand better how and why educational technology may help teachers meet more effectively the developmental needs of all students — including those with special needs — in all settings; and experience many of the decisions that teachers have to make when they incorporate educational technology into everyday classroom instruction.
The educational technology course helps teachers incorporate modern technologies of instruction into their classroom practices. More specifically, the course content covers several important interrelated subthemes – namely, rationales for incorporating educational technology, principles of visual/photographic literacy and design, educational videography, the Internet and telecommunications, and educational multimedia – as well as issues, trends, and emerging technologies.
The essential focus of this paper, however, is to describe only one of the several units contained within the educational technology course as a whole, specifically, the educational videography unit. The purpose of this unit is twofold: (a) to encourage the graduate students to develop teaching materials for their pupils and (b) to use wisely technology already in their classrooms so that they, in turn, will ultimately turn the technology over to their students, allowing the younger learners to construct their own meaningful subject-matter content.
This educational videography unit typically lasts 6 weeks, during which students are introduced to fundamental videographic principles and processes, such as pictorial continuity, basic shots, camera angles and movements, elements of storyboarding, digital video editing, audio mixing, and so on. In addition, they are given opportunities to “play,” practicing with the digital camcorders themselves so they can experiment and become more comfortable with their essential functions. Finally, students are required to produce collaboratively, in small groups of three or four, a 1- to 3- minute video that demonstrates pictorial continuity, or visual coherence (Sherman, 1991).
Underlying Pedagogical Philosophy
Given the fact that practically all American classrooms contain one or more high-speed computers connected to the Internet (Thompson, Bull, & Bell, 2005), given that most computers have multimedia capabilities, and given that many of these computers – either Windows-based or Mac-based – generally come prepackaged with digital video editing capabilities that accompany their operating systems (e.g., Windows Movie Maker or Apple Computer’s iMovie), classroom teachers of almost any grade or age level can easily – and relatively inexpensively – discover exciting and novel ways to engage and motivate their students in learning subject matter content in a variety of ways, thus meeting the diverse needs of their learners.
Defining Educational Technology
Why should teachers devote precious planning, preparation, and academic learning time in order to learn for themselves and, subsequently, teach their own students, the basic principles and applications of nonlinear digital videography? To address this fundamental question, educators must have a clear understanding of what educational technology (ET) is and how it operates. ET is defined as the systematic and creative blending of “product” and “idea” technologies (Hooper & Rieber, 1995) with subject matter content in order to engender teaching and learning processes within and across disciplines (Bednar & Sweeder, 2005; Sweeder & Bednar, 2001; Sweeder, Bednar, & Ryan, 1998). Others have more recently begun to make this critical connection under a different concept name, “technological pedagogical content knowledge” (TPCK; Koehler & Mishra, 2005). Similar to Koehler and Mishra’s “situated form of knowledge,” which they dub TPCK, educational technology explores “the dynamic, transactional relationships [among] content, pedagogy, and technology… recognizing that [effective] teaching with technology requires understanding the mutually reinforcing relationships [among] all three elements taken together to develop appropriate, context specific strategies and representations” (p. 95).
Digital videography, on the other hand, is merely one facet or subset of ET in that it integrates or blends “product” technologies such as computers, camcorders, tripods, and editing software with “idea” technologies, such as multiple intelligence theory (Armstrong, 2000; Gardner, 1999), cooperative learning elements (Wilen, Ishler Bosse, Hutchison, & Kindsvatter, 2004), and Sherman’s (1991) three-stage videographing process with subject-matter content. In the educational technology course, the digital videography unit integrated subject matter content such as ethical problem-solving (e.g., The Purse), automotive driving skills (e.g., A Day in the Parking Lot), positive study habits (e.g., Under Pressure), and elements of basic hygiene (e.g., Share Your Snack, Not Your Germs).
In parsing this definition of ET, one might ask, what is particularly systematic about this unit on digital videography? The answer is the course instructor’s deliberate decision to use three “idea” technologies themselves, which when melded together, formed the structural underpinnings upon which the videography unit rests: Multiple Intelligences (MI) Theory, Cooperative Learning, and the Videographing Process.
Systematic Blending: MI Theory. During the 6-week period students tap into and tacitly assess their own intelligence profiles (D’Arcangelo, 1997) when they create a video from scratch. Often students recognize which of their own unique talents lend themselves to individual responsibilities; thus, they may gravitate toward certain jobs for which they think they have a special affinity. For instance, scriptwriters use their linguistic talents to produce their treatments, storyboards, and rundown sheets and employ language to convey their ideas to one another in a clear, convincing fashion.
Camerapersons exercise their spatial intelligences as they frame and compose each shot. Directors tap into their interpersonal talents as they manage time, keep track of deadlines, settle minor aesthetic disputes, and make leadership decisions. Actors in the videos often rely on their bodily-kinesthetic skills, making sure that their audiences “get” the emotions they may wish to convey. The audio engineers, those responsible for adding the appropriate sound tracks to the work during the editing process, often tap into their musical intelligences when selecting pieces of music, for instance, that appropriately match the pace and mood of a scene.
Other times, however, students who thought they possessed little, if any, technical skills discover they indeed possess the aptitude, for example, to trim frames of video and eliminate jump edits from an incongruous scene in their group’s movie story.
Systematic Blending: Cooperative Learning. Earlier in the course, the students are reacquainted with the five basic elements of cooperative learning:
- Establishment of positive interdependence
- Establishment of face-to-face promotive instruction
- Individual accountability
- Promotion of interpersonal and small-group skills and communication;
- Ensurance [sic] that groups process their achievement and maintain effective working relationships (Wilen et al., 2004, pp. 288-289).
Each of these elements present authentically because the individual production teams evolve as the process unfolds. The course instructor provides students with a copy of the assessment rubric, so each production team knows how it will be evaluated and assigned a grade.
After groups review the assessment rubric, students within the production teams choose individual roles to fulfill, assuming the responsibilities of director, writer, talent, cameraperson, editor, and so on. Students share what they learn as they work through the various stages of their video projects, often helping one another discover the nuances of their own particular job. For instance, video editors often collaborate and teach other group members how to use the various computer commands contained in editing software such as Pinnacle Studio. Before each production team creates its video, students briefly review the rubric used to assess their work (see Appendix A).
Although individual grades are not typically assigned for the educational videography project, group grades are. Thus, implicit within the crucial component of individual accountability the instructor needs to monitor the small groups closely and consistently as they work. Given the level of maturity and sense of fair play that graduate students possess, coupled with the intrinsically interesting video project itself, students willingly accept their individual responsibilities in order to ensure that group tasks are completed successfully to the best of their abilities. Careful listening as well as a willingness to handle conflicts and compromise are central requirements for all group productions to be successful and finished on time.
Finally, when each group’s video is complete, its members collectively compose and submit a single typewritten group assessment, in which they discuss the discoveries they made as they produced their video, the successes and shortcomings of their products, and the individual responsibilities they assumed during each phase of the production process. Most often, group assessments are completed outside of class, online through e-mail. Hard copies of the assessments are subsequently submitted to the professor along with the completed storyboards, rundown sheets, and videos.
Systematic Blending: Videographing Process. Sherman (1991) pointed out that creating a visually coherent movie story involves the successful completion of a three-stage process: preproduction, production, and postproduction, or planning, shooting, and editing. During the 6-week videographic unit each production team generates a rundown sheet and creates an individual storyboard (i.e., its preproduction outcome); shoots an unedited master digital videotape, then downloads and digitally edits each master tape while adding audio (i.e., its production outcome); and outputs to DVD a revised and edited video that possesses pictorial continuity (i.e., its postproduction outcome).
Analogous to the writing process – prewriting, writing, and revising – learning to make a video may well pose as formidable a task for first-time videographers as composing a well-developed expository essay is for a novice writer. Videography may seem intimidating to some, pure fun for others. Nonetheless, creating a cogent story on videotape can be best accomplished by
- Inventing an interesting and purposeful visual concept; by scripting or storyboarding that idea (which is often done after devising a rundown sheet); by gathering the necessary props and costumes.
- Selecting, repurposing, or creating appropriate “sets.”
- Shooting each scene in a visually interesting and coherent fashion, which is basically accomplished through a series of shots comprised of different lengths, distances, angles, and so on.
- Editing each scene in order to trim or eliminate unnecessary or unwanted frames or shots, creating logical visual transitions such as fades or dissolves, and adding sound, which may consist of music, special effects, or voiceovers.
Creative Blending. In continuing to parse the definition of ET, what are the parallel “creative” aspects of this unit on educational videography? Creativity manifests itself in many forms as the unit unfolds. It emanates from the way the instructor develops, transmits, and sequences the important core concepts, the individual unit activities themselves, and the selected application of idea technologies. It emanates also from the dynamics of each small-group student interaction, from the specific product technologies made available to students, who use those technologies to construct their videos and from the original insights and discoveries the students themselves derive from the content and process of their video projects.
Educational Videography: A Time-Tested Instructional Unit
The following week-by-week breakdown explicates how this educational videography unit systematically and creatively blends both product and idea technologies as preservice and in-service teachers ascertain the essentials of nonlinear digital video and experience producing educational videos of their own.
Week 1: Basic Grammar
During Week 1, before any preproduction and project planning begins, the course instructor explains and demonstrates, using a variety of media resources (such as Videomaker’s videotapes entitled Basic Shooting, Videomaker, 2002, and Introduction to Digital Video Editing, Videomaker, 2003, as well as Krivicich’s, 1998, interactive multimedia CD-ROM entitled How to Make Your Movie), the basic grammar of film and video so that students become familiar with the fundamental concepts and lexicon of videography. In addition, the instructor engenders within each of his preservice and in-service teachers a metacognitive awareness of how the three main idea technologies – multiple intelligence theory, the video production process, and cooperative learning – are deliberately melded as they are unobtrusively applied throughout the 6-week unit.
Normally, classroom teachers need not make explicit for elementary or secondary students the underlying pedagogy they incorporate into their instruction; however, in order to emphasize the importance of how theory bolsters classroom practice, such metacognitive experiences should be explicitly conveyed by the university instructor so that the preservice and in-service teachers will be more likely to recognize their utility and potency and subsequently emulate them in their own classrooms. It is not absolutely essential, however, that those three particular idea technologies be blended in order to conduct an “effective” videography unit. On the contrary, teacher educators, and by extension, classroom teachers, should judiciously and creatively blend technologies they believe will be most effective, given their curricula and objectives, student populations, unique classroom contexts, and personal philosophies of teaching.
After their orientation to basic videographic grammar, the preservice and in-service teachers begin their creative play by completing a brief warm-up activity, designed to give them practice handling the digital camcorders and tripods to reinforce the concepts that have just been taught and to gain firsthand familiarity with the specific equipment they will use to shoot their videos (see Appendix B).
Week 2: PreProduction
After students read Sherman’s (1991) Videographing the Pictorial Sequence, as well as few additional articles dealing with educational videography (Clevenson, 1999; Hoffenberg & Handler, 2001; Nulph, 2003; Ross, Yerrick, & Molebash, 2003; Wilhelm, 1996), they take a test at the beginning of class during Week 2 of the unit. This test reinforces the declarative and procedural knowledge they have studied, and prepares them to apply these concepts correctly throughout all phases of their video projects (see Appendix C for a sample of potential test questions students use as study guides).
Having completed their brief half-hour tests, students are introduced to the requirements and parameters of the video project (see Appendix D) then form their small video production teams to begin the project’s preproduction process: brainstorming for ideas, concepts, and plots, which they can subsequently record visually onto tape and share with an audience.
Since the course instructor does not assign specific topics and purposes, student groups devote their initial energies determining their videos’ content, aims, and “working” titles, carefully taking into account that the choices they make must be feasible given their limited resources, especially time. As the overarching goal for this video project is for preservice and in-service teachers to learn how to produce an educational video, their movie stories’ topics, purposes, and target audiences vary. The course instructor encourages his students to be creative and purposeful when choosing their videos’ content. For example, the purpose of A Day in the Parking Lot is to teach parallel parking with the intended audience of an adolescent driver-education class. The course instructor recommends topics for production teams experiencing “writer’s block,” such as “The Discovery” or “The Experiment.”
To encourage students to think in visual terms and to discourage reliance on the use of spoken language, the instructor requires that all videos be shot as if they were silent films, thus ensuring that visual primacy is the focus and that students’ movie stories are not told, but shown.
After the instructor approves the groups’ topics and purposes, they begin creating their rundown sheets –outlines that briefly identify and describe the sequence and types of camera shots—using a word-processing program. (See Appendix E.)
Each team needs to be able to convey in writing the specific purposes of its project.
Storyboarding may also begin at this time, and Sony Mavica cameras are provided for each group (see Appendix F).
These digital still cameras enable student videographers to capture and subsequently print a “frame of video” (see Figure 2).
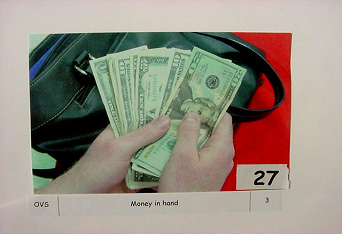 Figure 2. Frame of video from The Purse.
Each group’s printed frames of video are then used to create the required storyboards. Students are shown that an effective storyboard is not unlike a successful comic strip in that, just as the frames of an entertaining comic strip convey a story that contains a beginning, middle and end, so do the frames of an effective storyboard convey a complete, coherent movie story.
Storyboarding is an especially powerful form of planning, because it compels preservice and in-service teachers to think visually. Since thinking visually is something that most adult educators are not necessarily accustomed to doing, it provides the added benefit of convincing them that their video projects are viable—it forces them to prove to themselves, as well as the course instructor, that the abstract ideas they wish to convey can indeed be concretized and subsequently recorded onto digital videotape in a way that makes visual sense to an outside audience.
Students are encouraged to use their digital still cameras to scout their locations. Most of their shooting tends to take place outside of the immediate ET classroom on campus parking lots, in student cafeterias, in other offices or classrooms, in hallways, in gymnasiums, and so on.
Student storyboards are seldom completed during Week 2; however, the production teams are required to finish, online via e-mail, their rundown sheets so they can begin shooting their videos immediately at the beginning of the following week’s class. Before students are dismissed for this week, the instructor asks them to prepare in advance and subsequently bring in the following week any graphics, costumes, and props they will need for their “shoots,” prompting them to make written lists and share responsibilities.
Week 3: Production
As students enter class during Week 3, they pick up their camcorders, tripods, tapes, and digital video cameras to complete their visual plans (i.e., their storyboards), as well as their 1- to 3- minute videos. The course instructor reviews briefly the primary goals of the class, troubleshoots any last-minute equipment problems, proffers a few last-minute tips, and answers any remaining student questions, then sends them on their way. Periodically throughout the evening, the instructor meets with each group to ensure that each team uses its time efficiently, to recheck the video equipment to ensure, for example, that every camcorder has sufficient battery power, and to make himself available for any extemporaneous technical, moral, or administrative support that students may need.
Because student videos usually consist of 25 to 40 separate shots, and since students are required to shoot their videos twice — in chronological order — during this evening’s 3-hour session, time management is critical for meeting shooting deadlines. Production teams typically complete their first drafts videos in about an hour and a half. They then replay them in their camcorders, looking for ways to improve the pictorial continuity and eliminate faulty camera movements or jump edits, and to improve the pacing, if necessary. The video production process, as stated earlier, is similar to the writing process: it is recursive, so students are reminded that revising as one creates is not unusual.
When students complete their second drafts, they again review them, return their equipment and tapes at evening’s end and await next week’s homework assignment. Students are instructed to select and bring in the following week some audio CDs containing musical tracks they believe suit the purposes, mood, and pacing of their videos, tracks that are intended to “run under” any voice-over narration or sound effect that might be needed to create their coherent movie stories.
They are also asked to print out their storyboard photos and bring them to class, along with large trifold art boards (see photo of storyboard for The Purse video in Figure 3), upon which each team’s student design artists arrange and mount their digital color pictures. These photographs are accompanied by written descriptive details that comprise the completed storyboards (e.g., the number, length, and camera angles and movements used in each shot, as well as a brief account of the action portrayed).
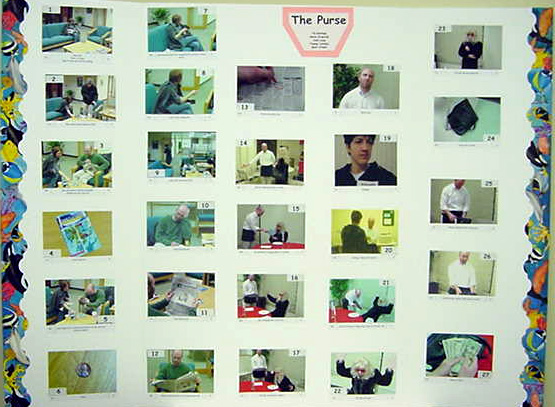 Figure 3. Storyboard from The Purse.
Week 4: PostProduction
Before students enter class during Week 4 the course instructor, in order to save time, captures all of the student videos by downloading them directly from the digital camcorders onto separate multimedia computers using nonlinear digital editing software. Students can easily perform this capture function themselves; however, capturing video is a relatively simple and passive job, requiring only a single student per group. Precious class time is often better spent editing. The instructor begins to tutor several of the students, specifically the video and audio engineers, showing them how to edit, render, and output to tape or DVD their group’s video footage as well as the music, sound effects, and voice-over narrations (see Figure 4).
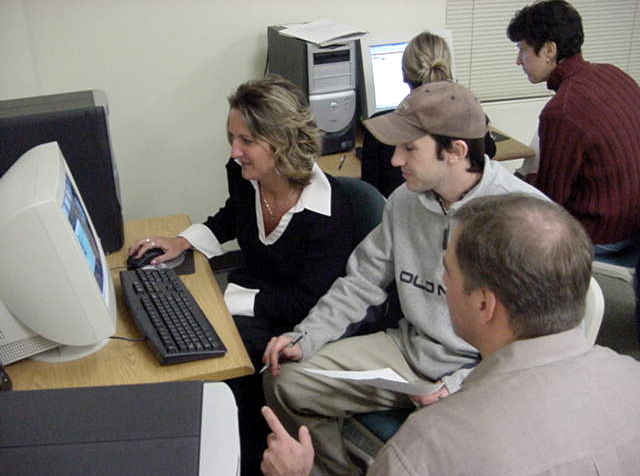 Figure 4. Student video engineers.
While the engineers are busy attending to their responsibilities, referring periodically to the step-by-step editing protocols provided by the instructor (or to the more detailed software manuals if and when necessary), other production team members spend their time revising and improving their storyboards and composing their detailed, small-group assessments. During the course of the following week, team members collaborate synchronously with one another in person or by phone or asynchronously via e-mail, copy editing and completing each component of their respective group projects using the provided rubric as their guide (see Appendix A).
Week 5: Project Submissions
As class begins on the fifth week, all components of the video projects are due. The edited videotapes, the revised storyboards and rundown sheets, and the typewritten small-group reflective assessments are collected and reviewed. If, however, student groups – for a variety of reasons – need additional time to revise, edit, and improve their projects, the instructor may grant students additional class time to complete their work.
Since video production is a creative, intrinsically motivating, multifaceted, collaborative, and emotionally intense activity, students often deserve being awarded extra time, especially if they request it in advance. In addition, because of the nature of video production, unintended technical difficulties sometimes occur, causing human tensions to arise.
For example, software sometimes unexpectedly “crashes” during postproduction, and novice video or audio engineers may not always save their work as they edit. Or perhaps one or two talents become ill or have last-minute family or work emergencies occur on the evening of their group’s “shoot” and, therefore, are unable to attend class. Both instructor and student flexibility are therefore imperative, especially since students’ dignity and grades are on the line.
Graduate students take special pride in their work and typically want not only to please their instructor, but also – and more importantly perhaps – not let their fellow teammates down. In light of such circumstances, course instructors need to build flexibility in their syllabi and class schedules to anticipate some unintended setbacks and to maintain a positive, productive classroom climate.
Week 6: Debriefing and Awards Ceremony
During the concluding week of this unit, videography projects are evaluated using the aforementioned rubric. However, on Week 6, before the graded projects are communally viewed, celebrated, and returned to the students along with their accompanying award certificates, the instructor spends important class time reiterating the underlying rationale for this extended activity. He puts into perspective the course’s overriding definition of educational technology and delineates exactly how the students themselves experienced the systematic and creative blending of several product and idea technologies that were integrated with subject matter of their choosing.
The course instructor shares aloud with the class a litany of student accomplishments during the prior 5 weeks. These accomplishments include inventing their movie story’s ideas and purposes; scouting various locales for their “shoots”; designing and selecting their sets; composing, typing, and printing their rundown sheets; creating and revising titles for their videos; shooting, organizing, reshooting, and printing digital photos for their storyboards using digital still cameras; gathering and organizing their props, costumes, make-up, and graphics; shooting and re-shooting their videos – under fairly strict time limitations; downloading their digitized video onto computers; selecting, editing, and mixing an assortment of musical soundtracks; editing video and audio, adding transitions, effects and credits; rendering and outputting their finished products to Digital-8 tape, VHS tape, video CD; or DVD; negotiating, compromising, and overcoming “creative” and “technical” difficulties – under pressure; and reflecting deeply upon their final products, as well as the entire experience itself. Additionally, the instructor notes that student videographers accomplished all of these feats with budget-friendly, consumer video hardware and software.
Recalling that most preservice and in-service teachers have never worked with nonlinear digital video/audio editing software, the instructor reminds them that they have demonstrated great pride in their work, a keen sense of accomplishment, and remarkable persistence, which are key indicators of student motivation. Throughout this unit they have remained active learners, who have taken creative risks in order to communicate content-specific ideas to variety of audiences in novel ways.
Finally, the instructor emphasizes the point that the students enrolled in this ET course need not only become familiar with, apply, and integrate all of the components of their projects into their own teaching, but also give their present and future elementary and secondary students opportunities to create coherent movie stories of their own. They, too, can master curricular content as they, under the facilitative guidance of their teachers, tap into their multiple intelligences and sharpen their negotiation, teamwork, and leadership skills as they assimilate a three-stage video production process in a discovery-oriented, creative, and constructivist fashion.
Discussion
Student Reflections, Themes, and Excerpts
Over the past few years student reactions and written feedback to these videography projects have been positive, critically analytical – and sometimes pleasantly surprising. In the aggregate, student comments suggest the following themes.
First, virtually every production team comments upon the pressure it feels as it strives to meet successfully its predetermined project deadlines, even though the course instructor sets tactical waypoints and emphasizes the importance of time management during each segment of the project. This reaction is not unexpected for any instructor who has ever infused technology into a methods-of-education course, or taught a stand-alone educational technology course that involves multimedia computers, digital-video equipment, and so on.
Thus, a critical skill for any teacher educator is the ability to anticipate this felt sense of student pressure and create a positive, balanced atmosphere of creative play, while simultaneously setting appropriate and manageable levels of student achievement by using specific criteria, typically conveyed through a shared rubric.
In addition, not unlike an effective science teacher preparing for a lab, the teacher educator needs to ensure that all equipment, cables, computers, cameras and so on have been “test driven” in advance and are in proper working order before the students arrive for each class meeting in order to palliate the natural stresses and anxieties many adult students experience when they engage with new or novel product technologies with which they may lack hands-on familiarity. For instance, the production team that developed the effective, humorous, and creative video, Blockheads: Trade-First Subtraction, (see Video 3) commented in its reflective, small-group assessment that “the established time parameters that were given by the instructor to complete the project are what we struggled with most.”
It is important to note, however, that during the several semesters in which the instructor has administered the video projects, not once has a group failed to complete its assignment on time. All have met successfully the challenges they faced.
Second, production teams take pride in and develop a sense of fulfillment in their ability to compromise, overcome adversity, and work together as a unit in close conjunction with one another. For example, one team began its written reflection by stating,
The collaborative process was one of the most difficult aspects of this project for our group ….Once we were redirected to narrow our focus… we decided to take a short break which enabled us to clear our minds and develop a concept for our video. After brief internet research on the subject of Dr. Suess we were able to create a story line around the book, “And to Think That I Saw It on Mulberry Street”….During the actual filming process we worked very well as a team….While the DVD was being burned Cherie Lynne and Matt went to help Janelle with the creation of the storyboard.
The third reccurring theme relates to the production teams’ ability to recognize and capitalize upon each member’s individual strengths. For example, one team wrote, “Janelle was an awesome on-screen talent. She took stage direction and obstacles with grace.” And another team stated, “Each of us has worked together before in previous graduate courses…. We knew each other’s strengths and weaknesses, which made dividing the duties of the project less stressful.”
Fourth, production teams were successful in assimilating a new, specialized vocabulary: the visual lexicon they had been taught and learned about. For instance, one team wrote,
We were able to smooth over most of the pictorial continuity issues….We realized there were a few jump edits…. One specific jump edit was when the camera went from an establishing shot to a medium shot of Janelle in scene three. The transition was not as smooth as we would have preferred….We could have prevented the noticeable transition by using the zoom option instead of trying to avoid it as recommended. The other option would have been to insert a cut-away to a specific item in the hospital room during editing. [Italics added for emphasis]
Similarly, another group stated,
The final product is one with very strong pictorial continuity with a fairly wide variety of shots. The opening shot which begins with an unorthodox pan from the classroom sign to a peek into the classroom serves as a very effective establishing shot (ES) for the film. Once inside the classroom the viewer is oriented nicely to the action with a long shot (LS) of the teacher writing the subtraction problem on the board. The film moves efficiently forward from this point with appropriate pacing as differing shots are implemented: from numerous side angles, over the shoulder (OVS) shots from the perspective of the two students, high angle shots of the students at work (giving the viewer a feeling that the students are subordinate to the teacher), and a series of close-ups (CU) and extreme close-ups (ECU) of the students at work. [Italics added for emphasis]
The fifth theme deals with the production teams’ ability to adapt to minor, technical setbacks, and to problem-solve in appropriate — and sometimes unexpected —ways to improve the quality of their completed video projects. For instance, one group commented, “Upon creating the storyboard we realized that three photographs [were] missing, but we were able to use existing technologies after altering them in Photoshop.” What is particularly significant about this comment is that the course instructor did not anticipate his students, initiating their own technological solution to a procedural problem by using a piece of software – Photoshop – that was not an officially sanctioned technology in this course. Students, to the surprise of the course instructor, took their own initiative by bringing their own technology to complete successfully at home a required component of the overall video project.
The sixth theme relates to the teams’ analytical ability to identify and discuss some of the shortcomings in making their first, coherent movie stories, as well as to suggest ways in which these developmental miscues could be remedied. For example, one production team commented, “We would definitely make a few changes. The first would be to try to use our tripod even more than we did during the initial shoot.” Likewise, another team wrote,
This film would also have been better served had it included some shots from the teacher’s perspective of the student working…. much of this could have been done with over-the-shoulder shots from the teacher’s perspective, and possibly reverse angles from the students’ perspective.
The seventh theme their reflective feedback conveyed deals with the elation each group experienced over the completion and success of their projects. (e.g., “Overall we’re very excited for our first ever video creation!” and, “It was amazing to see how this two-and-a-half minute film could be used as an engaging 30 minute lesson.”)
The eighth theme deals with the production teams’ willingness to “re-vision” and share their final products with real learners in authentic classrooms and make both planned and extemporaneous instructional adaptations to their teaching to promote more effective student comprehension. For example, one team member shared the video, “What a Trip!” with a class of six year olds, and subsequently wrote,
After Cherie Lynn premiered the movie to her first grade class we found that the students had a hard time grasping the main concept, although the audio track chosen seemed to capture the students’ imagination. After an additional discussion about tall tales and the reading of Dr. Suess’s book the students were better able to comprehend the movie story line. After the second viewing the students were able to recognize the dream sequence and the tall tale within the movie.
Another member of the Blockheads production team showed its video to a group of second graders to solicit their opinions about and discern their collective understanding of the mathematics video they made. In this team’s reflective analysis they wrote,
The students view[ed] the film in its entirety initially. The then viewed [it] with their teacher pausing and playing certain sections of the [DVD] in slow motion to discuss the action. Finally, they were given the opportunity to verbalize their feelings on the film….Even only after initial viewing…students were able to accurately sum up the action…and verbally display comprehension of what had occurred. There were also many laughs…. The film was then used as a teaching tool as the students described to partners the reasons behind why some of the action was occurring as the film was paused at selected points. After selected students offered their opinions on the reasons why the actors were doing what they were doing, the teacher showed much of the next scene in slow motion and was able to describe exactly what the actors were doing and why…[which] served to solidify the students’ understanding of the trade-first strategy for double digit subtraction.
The ninth theme that the production teams’ comments address deals with reiterating the significant “lessons they learned” as they created and reflected upon both the videographing process, as well as their final products. For instance, one group wrote,
It is with the clarity of hindsight, that we realize how valuable the run-down sheet truly was…to complete the film in the given timeframe…. [The run-down sheet proved] to be an effective crutch for us again when it came time to edit our film….Time spent logically designing each shot in pre-production paid great dividends in helping to produce, what we believe to be, a quality film…completed with many shared laughs throughout the entire filmmaking process.
Finally, production teams frequently surprised the university course instructor. Some creatively extended the parameters of their video projects by going beyond the requirements delineated in the assessment rubric provided, and others did something unexpectedly unconventional as they planned, shot, and produced their videos. Two examples come to mind: One group, for instance, hand-designed playful, colorful, and age-appropriate cover art and put it on the actual DVD disc that contained their three-minute video, What a Trip! (See Figure 5).
 Figure 5. Cover art from What a Trip!
Another group shot its video in a 16:9 widescreen format (up to that point in time, all videos had been shot in the standard 4:3 aspect ratio), which added to the overall aesthetic of viewing their muppet-like video entitled, Ants March to 10. This project intended to introduce, teach, and reinforce the basics of counting single- and double-digit numbers to preschool students in a highly motivating and entertaining manner. (See Video 4.) For this shoot, the production team created and designed a magnificently colorful set, replete with flowers and knolls, as well as detailed costumes for their irresistibly cute, animated ants.
“Re-Visioning” Video Projects: Some Implications for Teacher Education
Reading Relevant Literature
One of the challenges teacher educators face is keeping up with the swift, ever-changing technological professional landscape: the seemingly endless software upgrades, the varied and wide-ranging technological readiness levels of preservice and in-service teachers, the increasing emphasis upon meeting state-mandated standards, as well as the differentiated needs of children and adolescents for whom our teachers prepare their lessons. Print and online journals can help educator remain alert to changes in the field. Videomaker is one example. Its authors and editors not only critically review and rate a variety of the latest product technologies, but also write user-friendly articles that briefly and accurately describe the basics of producing videos at all levels of sophistication. Other relevant journals include Learning and Leading with Technology, Computers in the Schools, TechTrends, Current Issues in Technology and Teacher Education, and The Journal of Technology and Teacher Education.
Keeping Standards in Mind
Another way teacher educators might use and adapt the type of video projects described in this article is by exploring ways in which videography can help preservice and in-service teachers identify specific state-mandated content and performance standards their students’ video projects might address both in and across a variety of subject-matter disciplines. For instance, The Pennsylvania Department of Education’s Academic Standards for Reading, Writing, Speaking and Listening suggests that by the end of Grade 3 students should be able “to acquire the knowledge and skills needed to…identify techniques used in television and use the knowledge to distinguish between facts and misleading information.” By Grade 5 they should be able to “establish criteria to design and develop a media project for a target audience,” and by Grade 8, they should be able to “use, design and develop a media project that expands understanding.” Thus, in creating the guidelines for video projects course instructors may want to require preservice and in-service teachers to list and show how each of their videos address the specific state (e.g., Pennsylvania State Standards), organizational (e.g. National Council of Teachers of English Standards), or national standards (e.g., National Educational Technology Standards).
Differentiating Instruction
Video projects may also help teachers more fully differentiate their instruction and assessment. Videos are by their very nature multimodal; thus, such projects help to meet the needs of visual and auditory learners. And if, for instance, close captioning or subtitling were added to videos using graphic generators contained in most pieces of digital video editing software, one might be able to address the needs of special and English language learners, as well.
Educational Video Repositories
If teacher educators and regular classroom teachers and their students begin producing short, effective, instructional videos on a larger scale, then one can envision saving them to a Web-friendly format (e.g., a Windows Media or Real video file) and subsequently uploading them to the Internet to share with others. Teachers might then create Educational Video Repositories (i.e., resembling a peer-reviewed, vetted, or filtered U-Tube-like site) of standards-based teacher and student-created instructional videos that help teach subject-matter content within and across the disciplines.
In conclusion, the 6-week unit of instruction can be easily adapted for undergraduate or graduate education programs that meet more often than once a week, or for extended, districtwide, in-service programs and workshops in basic education. Simple infusion of digital videography into preservice and in-service teacher education programs interests and motivates most any elementary, special education, or secondary classroom teacher. However, when digital videography is contextualized and taught within the more grand pedagogical framework of educational technology, as it has been defined, described, implemented, and demonstrated in this article, it metamorphoses into a more powerful, embracing tool for teaching and learning. It nurtures deeper understanding of curricular content, while simultaneously addressing the diverse cognitive, social, and technological needs of 21st century teachers and learners.
Acknowledgement
Special thanks are given to Maryanne R. Bednar, trusted colleague and friend who provided this author with timely and much appreciated editorial feedback and advice in the preparation of this manuscript.
References
Armstrong, T. (2000). Multiple intelligences in the classroom (2nd ed.). Alexandria, VA: Association for Supervision and Curriculum Development.
Bednar, M. R., & Sweeder, J. J. (2005). Defining and applying idea technologies: A systematic, conceptual framework for teachers. Computers in the Schools, 22(3/4), 35-47.
Branigan, C. (2005).Video goes to school. eSchool News, 8(4), 25-29.
Clevenson, R. (1999, February). Picture-perfect communication. Educational Leadership, 56(5), 66-68.
D’Arcangelo, M. (Project Manager and Producer). (1997). Exploring our multiple intelligences [CD-ROM]. Alexandria, VA: Association for Supervision and Curriculum Development. (Stock No. 59276.)
Hoffenberg, H., & Handler, M. (2001). Digital video goes to school. Learning & Leading with Technology, 29(8), 10-15.
Gardner, H. (1999). Intelligence reframed: Multiple intelligences for the 21st century. New York: Basic Books.
Hooper, S., & Rieber, L. (1995). Teaching with technology. In A. Ornstein (Ed.), Teaching: Theory into practice (pp. 154-170). Needham Heights, MA: Allyn & Bacon.
Koehler, M. J., & Mishra, P. (2005). Teachers learning technology by design. Journal of Computing in Teacher Education, 21(3), 94-101.
Krivicich, D. (Executive Producer). (1998). How to make your movie: An interactive film school. [CD-ROM]. Athens, OH: Ohio University.
Nulph, R. G. (2003). Composing your shots. Videomaker, 17(10), 62-66.
Ross, D. L., Yerrick, R., & Molebash, P. (2003). Lights! Camera! Science! Learning and Leading with Technology, 31(3), 18-21.
Sherman, M. (1991). Videographing the pictorial sequence. Washington, DC: Association for Educational Communications and Technology.
Sweeder, J.J., & Bednar, M. R. (2001). “Flying” with educational technology. Contemporary Issues in Technology and Teacher Education, 1(3). Retrieved May 7, 2006, from https://citejournal.org/vol1/iss3/currentpractice/article2.htm
Sweeder, J. J., Bednar, M. R., & Ryan, F. J. (1998). Conjoining product technologies with multiple intelligence theory: Rethinking teacher preparation. Journal of Technology and Teacher Education, 6(4), 273-282.
Thompson, A., Bull, G., & Bell, L. (2005, Spring). A proactive approach to a research agenda: A call to action. Journal of Computing in Teacher Education, 21(3), 74, 76.
Videomaker. (2002). Basic shooting: The essential guide to basic camcorder techniques. [VHS tape]. Chico, CA.
Videomaker. (2003). Introduction to digital video editing: The guide to getting started with computer video [VHS tape]. Chico, CA.
Wilen, W., Ishler-Bosse, M., Hutchison, R., & Kindsvatter, R., (2004). Dynamics of effective secondary teaching (5th ed.). White Plains, NY: Addison Wesley Longman, Inc.
Wilhelm, R. D. (1996). Strengthening the visual element in visual media materials. TechTrends, 40(2), 24-25.
Author Note
John Sweeder
La Salle University
[email protected]
Video Project: Assessment Rubric
Group Members:
4 = Superior Work: a model for others to emulate
3 = Very Good: Fulfilled all requirements in a competent manner
2 = Satisfactory: Fulfilled most requirements, but problems or omissions still exist
1 = Unsatisfactory: Did not meet the minimum requirements
________. The Process: collaborative support; individual accountability; effort; enthusiasm; keeping lines of communication open throughout the project; ability to handle obstacles and setbacks with grace and perseverance; ability to meet intermediate and final deadlines
_______. The Storyboard and Rundown Sheet: creativity, detail, appropriateness. The storyboard and rundown sheets make sense in and of themselves. They indicate a clear beginning, middle, and end. They possess an identifiable central theme, which is audience appropriate.
_______. The Product: pictorial continuity, evidence of videographic literacy (e.g., stable shots using a tripod, slow pans and tilts, minimal zooms, varied angles, use of basic shots, cut-aways, cut-ins, subjective camera, reaction shots, proper headroom, pacing, clean entrances and exits, and so on); audio: appropriate use of music, voice overs, sound effects or a combination thereof.
_______. Group-Assessment: neatly typed reflective analysis that discusses, with a sufficient degree of depth and clarity, the strengths and shortcomings of your product as well as your process. Suggestions for revisions were also noted. Incorporated the videographic lexicon you have learned.
Overall Grade: ______
Practicing Basic Videographic Principles:
Warm-Up Activity
Using both camera and tripod, shoot a brief video that demonstrates each of the following shots in the specific order listed below:
Establishing Shot
Long Shot
Medium Shot
Close up (with appropriate headroom)
Extreme Close-Up
Pan (Slow & Smooth)
Tilt (Slow & Smooth)
Dolly Shot
Tracking Shot
Clean Entrance
Clean Exit
Group members:
Educational Videography: Questions to Consider
“Strengthening the Visual Element in Visual Media Materials” – Wilhelm (1996)
- What is the central point of this article? Can you paraphrase it in one sentence?
- What should one do before beginning to write a script or storyboard for a video?
“Composing Your Shots” – Nulph (2003)
- What is “composition?”
- What are some common “composition” problems (e.g., tromboning) that videographers deal with? What are the solutions to those problems?
“Picture-Perfect Communication” – Clevenson (1999)
- What are some of the ways that teachers and students at Gunston Middle School use video production? Why? What benefits do they derive from that use?
“Digital Video Goes to School” – Hoffenberg and Handler (2001)
- What are the authors’ reasons for having students use digital video for classroom projects?
- What do the authors mean when they state, “educators must aim for curriculum-driven technology use, not technology-driven curriculum?”
- Which video projects that the authors describe hold most appeal for you?
“Lights! Camera! Science!” – Ross, Yerrick, and Molebash (2003)
- Why did the science teachers require their students to create storyboards for their science experiments?
Video Project: Requirements and Parameters
Overall Goal: Create a “movie story” that demonstrates pictorial continuity. Be sure your video
- contains a clear beginning, middle, and end;
- contains a focused, identifiable theme that is audience appropriate;
- lasts between one and three minutes in length; and
- contains an audio track consisting of music, sound effects and/or voice-over narration (or any combination thereof).
Collaborative Responsibilities
producer
director
cameraperson
writers: ones who compose the script, storyboard, and/or treatment
designers: art/costume/graphics
audio engineer
talents: includes all on-camera performers and voice-over narrators
grips/gaffers
editor/continuity
Tips
- Edit your video “in the camera” as much as possible;
- Make sure your video is doable – that is, capable of being shot within the time you have been allotted;
- Tell your “story” visually;
- Be creative and have fun!
Video Project: Pre-Production
By the end of class, please submit the following:
1. Names of group members:
2. Working title for your video:
3. The purpose(s) of our video is/are to show
![]()